When to Plant Hops
One of the basic ingredients in beer is also very easy to grow. Hops will thrive in most moderate climates. Learning how to plant and care for Hops is easy and rewarding with your own homebrew hops garden.
The hop plant is a hardy perennial plant. It will grow vines annually from the rootstock. These vines will grow up to 25 feet each season and die back after the harvest. The rhizome is part of the rootstock but posses the buds for propagation. Under good conditions, each hop vine will produce 1/2 to 2 pounds of dried flowers.
You may be asking, “can I plant hops where I live?”
The answer is yes…. probably. Hops are hardy in U.S. Department of Agriculture plant hardiness zones 3 through 8. Most of the US in in one of these zones. Here is a USDA Map of the United States that shows exactly where the hardiness zones are. The temperatures are the average minimum temperatures for each area:
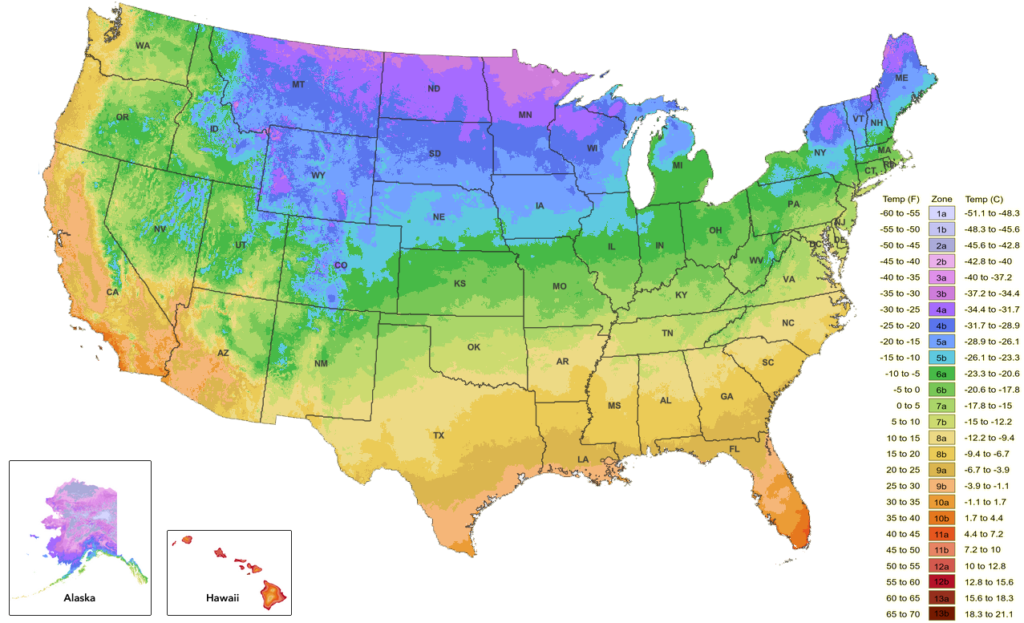
Even parts of Alaska and Hawaii are suitable for growing your favorite hops.
What Time of the Year to Plant Hops
Planting months can very from coast to coast. California can probably plant earlier that Maine, but early May for most of the country would be as late as you would want to plant.
Hop Rhizomes are typically cut in March or early April. As with all crops, this depends on the weather. If the farmer’s field is too wet, they have to wait for the water to drain. The problem can get worse if the field is still covered in snow. The farmer needs to wait for the snow to melt and then the fields to drain. It is also possible that not all varieties are going to be harvested at the same time. If some of the fields have better weather than others, they will cut rhizomes at different times.
Adventures in Homebrewing ships their Hop Rhizomes as soon as they arrive from our farmers, which is typically early April. As long as your planting area is out of frost danger, we recommend planting in the ground as soon as you receive them. If your mounds are ready and mulched properly, rhizomes can survive days as cold as 20°.
If you have to store the rhizomes for a bit after you receive them, store them in the refrigerator until you are ready to plant.
Although most varieties will thrive if you are in a temperate region, there are a few variables you should consider when deciding on a variety of hops. If you are planting your hops simply for their aesthetic value, then you are really free to choose any variety you please. If you are in an area that sees a shorter growing period, you may want to plant a vine that will develop more quickly, allowing you to enjoy your plants for the longest possible period. Growing your own hops is rewarding and exciting. Adventures in Homebrewing can help you get started on this great part of the hobby with your own homebrew hops garden. Shop Hop Rhizomes.
Cheers!


 Yesterday, I posted