
 After you have cleaned and sanitized your homebrew keg, you are now ready to put your own beer in it. These instructions below will show you how to fill a keg with homebrew beer. It will guide you step-by-step through the process of moving beer from your fermenter into a Cornelius style keg.
I’ll admit that the first time I used a homebrew keg system I was a little nervous. Something about all that pressurized CO2 gas made me feel uneasy. But it’s not as complicated as you might think. The main things to look out for are A) safety, and B) leaks. Any time you open the keg, vent it first through the pressure relief make sure the keg is not under any pressure. Whenever you are preparing to fill your keg and after you’ve filled it, check for leaks. CO2 can be costly. I’ll walk you through how to check for leaks in the instructions below.
Even though there are some mandatory steps you must take, the benefits of using a kegging system heavily outweigh any regiment you must endure.
Without further ado, how to fill a keg with homebrew!
 After you have cleaned and sanitized your homebrew keg, reassemble it. To review how to clean and sanitize your a keg, visit our how-to instructions for cleaning and sanitizing your homebrew keg.
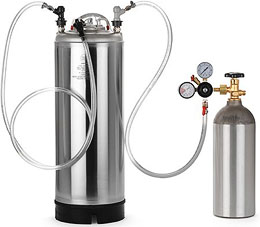
- Attach your CO2 tank and regulator to the keg by connecting the gas quick disconnect to the gas-in post.
- Use a sponge and soapy water to test for leaks by dabbing the sponge around all the CO2 connections, posts, and lid.
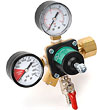
- Set the regulator pressure to a low setting, about 5-8 psi, and then open the regulator valve. Any leaks should produce bubbles where you dabbed the soapy water. If needed, tighten connections, replace o-rings, or use Teflon tape to ensure a tight seal. Keg lubricant can also be used around o-rings for a better seal.
 Vent the keg through the pressure relief valve 3-5 times to expunge air from the keg. A 100% CO2 environment will improve the “shelf life” of your homebrew.
- Turn the valve on your regulator into the “off” position and vent all pressure from the keg. Double-check that you vented the keg completely.
- Remove the lid. Since CO2 is heavier than air, your keg should still be full of CO2.
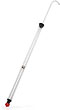 Using a sanitized siphon, transfer your homebrew into the keg. I highly recommend an auto-siphon if you don’t have one already. This will help you to get the siphon started without a lot of commotion.
- Replace the lid by pulling vertically on the lid and holding it in place, and then apply CO2 pressure. The CO2 pressure will push the lid into a good fit. Now clamp the lid into place.
- Switch your regulator to the “on” position and apply 5-10 psi of CO2 to the keg.
- Your homebrew is now ready to be carbonated! There is more than one way to go about carbonating a keg beer. Force carbonation is the most common method, but you can also carbonate a beer in a keg by conditioning. Here’s some information on how to carbonate your homebrew in a keg.
And that’s how how to fill a keg with homebrew. Do you keg your homebrew? What tips do you have to share about filling your homebrew keg?
———————————–
David Ackley is a beer writer, brewer, and self-described “craft beer crusader.” He holds a General Certificate in Brewing from the Institute of Brewing and Distilling and is founder and editor of the Local Beer Blog.