Adding Yeast To Homemade Wine: Sprinkling vs. Rehydrating

Checking temperature before adding yeast to homemade wine.Maybe you can answer a question that I have. When adding wine yeast to a juice or kit, do you need to place it in hot water as the directions say on the yeast package, or can you just sprinkle it onto the must? I noticed that some wine recipes call for the wine yeast to be placed in hot water first, and other recipes call for the yeast to be sprinkled on the top of the must. What is the best thing to do?

Eric L. – OH
—–
Hello Eric,

You are correct! There is some conflicting information running round when it comes to adding yeast to homemade wine. Almost all wine ingredient kit directions and wine recipes will say to sprinkle the dried wine yeast directly on top of the juice, but if you look at the packet of wine yeast itself, it will have directions that instruct you to put the yeast in warm water first. So, what should you do? How should you pitch the wine yeast?

Putting the wine yeast in warm water before adding it to a juice is a process called rehydration. What rehydration does is take a dried wine yeast and bring it back to an active state.Shop Wine Yeast

If you pitch the dried yeast directly into the wine must it will rehydrate and eventually start fermenting, anyway. So why do the yeast producers recommend this extra step before adding the yeast to the wine juice?

Why Rehydrate The Wine Yeast?

When a yeast cell rehydrates, its cell wall is swelling and gaining back its elasticity – its ability to flex and and be soft. This is a process that is prone to leaving a few cells damaged. In fact, a percentage of them don’t make it. But, by using plain water at an optimal temperature you are reducing the number of yeast cells that are being damaged during the rehydration process.

Why Sprinkle The Wine Yeast?

The reason wine ingredient kit producers, wine recipes, and even the directions on our website do not mention rehydrating before pitching the wine yeast is that many home winemakers – particularly beginners – do not perform the rehydration process correctly. Some tend to gloss over this procedure, not knowing its importance. This can cause more problems than if they had just added the dried yeast directly into the must.

As an example, the typical rehydration directions for adding yeast to a homemade wine goes something like this:

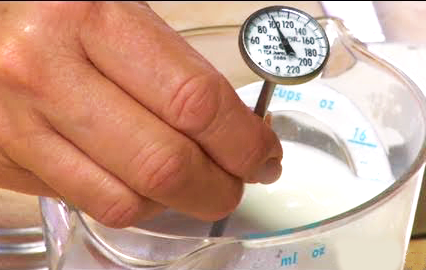
“Dissolve the dried yeast in 2 ozs. of warm water (100° – 105° F.). Let stand for 15 min. without stirring. After 15 min. stir and add to must.”

These are great directions and should be the directions you use with the yeast that came in this packet, that is, if you follow the directions, exactly. But if you don’t follow the directions, exactly, then things can start to go wrong – very wrong!

It is important to understand that at 100° – 105° F. a small portion of the yeast cells are dying every minute, and as the temperature goes up an even larger number die every minute. What this means is that if a thermometer is not used to make sure that the water is at or below 105° F., or the yeast cells are allowed to stay in the water for longer than 15 minutes, too much, or potentially all of the yeast can be destroyed before making it to the juice or wine kit.

A second complication is that it can take overnight or even a couple of days, for some, to discover that their wine is not fermenting or fermenting very sluggishly – much more so than if they’d just sprinkled the yeast onto the wine must in the first place. And this is a time that the wine is most susceptible to contamination and spoilage – before any alcohol has been made to help protect it. It needs an active fermentation to start up in a timely manner.

Buy Wine Bottle CorkersFor this reason, wine kit producers elect to play it safe and advise that adding the yeast to your wine, that you sprinkle the dried yeast on top of the wine must. This is a much better option that having a first-time winemaker ruin their wine.

What Should You Do?

Regardless of what method you use for adding yeast to your homemade wine – sprinkle dried yeast on the must or rehydrate the yeast – some of the yeast cells will die before going into action. That’s just the way it is, but that’s okay. The number of yeast cells that are provided in each packet allow for this attrition. Just remember that if you do decide to rehydrate your wine yeast before pitching it, it is critical that you follow the directions closely with regards to temperature and time. If you’re not willing to go through the hassle, just sprinkle the yeast on the must.

Happy Wine Making

How To Make Homemade Sparkling Wine

Glass of sparkling wineThere are many different ways to make sparkling wine. There is the Methode Champenoise, the traditional French method believed to produce the highest-quality sparkling wine. The Charmat Method, a.k.a. the more affordable method, which utilizes a tank and creates wine like Prosecco. The Transfer Method, a combination of the Champenoise and Charmat methods. The Carbonation Method, which we do not recommend, and a few other methods you can read about here. Today we are going to focus on the Methode Champenoise, the traditional way to make Champagne in France. 

Sparkling wine can take up to nine months to finish, so if you’re hoping to have your own bubbly for the holidays you’ll want to start soon. 

Step One: Your Wine Base

Prepare your wine base. To make quality sparkling wine you’ll want to start with a tart but not acidic wine like Chardonnay or Chardonnay style wines. Ferment the base wine the normal way up until the stabilizing step. Do not add the stabilizing add-packs; the sulfites might kill your yeast. Rack your wine into a carboy and wait. When it’s done fermenting, your acid should be crisp and tart, and your wine clean and free of any off-odors.

Step Two: Riddling

To make sure your Champagne has that clear, crisp color, riddling takes place. Riddling is a labor-intensive process that inverts the sparkling wine and twists the bottle back and forth over and over again. This process loosens the sediment from the bottom and sides and collects in the neck of the bottle in preparation for disgorgement. 

Step Three: Disgorgement

Disgorgement is a crucial step in making sparkling wine. The goal is to eliminate the deposit of sediment in the neck of the bottle that occurred during the riddling process. First, prepare your topping wine and sugar, called the dosage, and chill. Next you’re going to put the inverted bottle into the freezer. You want the wine close to freezing, but do not freeze completely or the bottle will break in your freezer. When you see ice crystals form in the neck, your wine is ready to be degorged.

For the last step you’ll want an open space that is easy to clean. Gently remove the bottle cap so the pressure in the bottle forces the sediment out. Carefully top the wine off with the dosage and re-cork. We recommend using plastic sparkling wine stoppers. Cork stoppers can be expensive, difficult to insert and difficult to remove.

Step Four: Enjoy!

Store bottles in a cool, dry place, and be sure to chill each bottle thoroughly before serving!

Cheers!

Gifts for Wine Makers: These 5 Gifts are Absolutely Perfect for Wine Lovers

Champagne in a bucketSo it’s nearing the holiday season and you don’t have your gifts together just yet.

Maybe because you started shopping just a little late this year or you’ve just been looking for that perfect gift and have yet to find it.

Regardless of why you’re still searching, you’ve put a lot of thought behind what would really make your loved one excited.

Online wine sales have grown 22% year over year.

This means that more and more wine lovers are beginning to shop online for all their wine needs.

But, online wine shopping can be a double-edged sword. The endless options can be overwhelming and make finding the perfect gift more difficult.

In this article we’re going to show you some of the best gifts for home winemakers that they’ll be sure to love.

The Top 5 Gifts for Wine Makers

Fermenting Bag

Wine fermentation bag

This handy jumbo fermenting bag is made from fine mesh, is heavy-duty and is designed to help with multiple uses. It’s extremely helpful in the different stages of the fermentation process because it keeps the pulp in control when the fruit is being crushed.

Being that this bag is 24” deep and 18” wide makes it excellent for wine creators that need a reliable fermenting bag. The drawstring included makes for easy handling while the durability enables it to withstand boiling temperatures.

This is a must-have for wine creators.

Glass Airlock

Wine glass airlock

This glass airlock is a key tool for making wine. Like the fermenting bag, it’s used during the fermentation process. The beautiful twin ball design makes this an amazing conversation piece.

This glass airlock is highly durable and has great capacity, maintaining batches of up to 20 gallons. It’s also super easy to fill because of the fluted opening and very fun to watch.

Our glass airlock is handmade, ensuring that you’ll have the best experience with lasting quality.

Heat Shrink Capsules

Wine heat shrink capsules

This is the perfect way to give your wine bottles a professional look. These capsules actually shrink and snug around both the neck and top of your bottle to give it that perfect fit.

They are very simple to use and work by placing the capsule over the neck of the bottle and placing it into hot water for around 10 seconds. The shrinkable PVC material fits the bottle perfectly.

These heat shrink capsules come with full instructions on how to use them and come in 9 different colors, including clear.

Sugar Scale Hydrometer

Wine sugar scale hydrometer

Our Sugar Scale Hydrometer is another great tool for winemakers. It helps keep track of the fermentation process and allows you to visually see the alcohol content before, during and after fermentation.

The included Sugar Scale shows how much sugar is contained in the liquid by ounces per gallon. The weighted glass sphere allows for the tube to stand in an upright position when placed in liquid.

The gravity scale ranges from .990 to 1.170 while the alcohol scale ranges from potentially -2 to +22%. This Sugar Scale Hydrometer also comes with a complete set of instructions.

Wine Making Books

Wine making books

One of the best gifts to give someone who is just beginning their wine making journey are books. While there are a slew of books online about wine making, our company has some of the best winemaking books that range from wine recipes to kit tips and woodworking for winemakers.

These make excellent add-on gifts that can be paired with some of our other products and make the ultimate wine gift basket.

Celebrate the holidays with Adventures in Homebrewing

Gift giving can be hard. But hopefully we just made it easier for you!

From beginner essentials to advanced tools for experienced makers, Adventures in Homebrewing has something for everyone.

If you’re looking for affordable, high-quality products, grab some gifts from our store for this upcoming holiday season.

Cheers!

How To Use Bottle Sealing Wax

Man Using Sealing WaxDear Mr. Kraus,

Did not receive any instructions on how to use the bottle sealing wax beads I ordered . What is the best method to melt the wax beads. Have never used this wax before. Do you sell some type of melter. If you would please let me know how to use.

Thanks,
Sammy L.
—–
Hello Sammy,

How you use the bottle sealing wax can vary somewhat. There is not a specific way it has to be used.

We recommend melting the sealing wax in a tin of the appropriate size. This can be something as small as a soup can if you are only doing 5 bottles. If you are doing 50 bottles you may want to use something as large as an old 2 pound coffee can tin. Sit the tin in a pan of water to make a double boiler on the stove. This will help the wax to heat more evenly over a period of time.

Once the sealing wax is melted you will want it to stay in that tin, permanently. The wax if very hard to remove once in a container, so don’t actually put the bottle sealing wax in any good pots or pans, themselves.

How to use the bottle sealing wax is something that can be approached from a couple of different angles:Shop Sealing Wax

  • Dip the whole neck of the wine bottle into the sealing wax.
    Not only will the wax be sealing the wine bottle air-tight, but it will also become part of the wine bottle’s decorative decor. The colors look incredible against the glass and can work together with the wine label to a bottle of wine worth sharing.The downside is that this method can use up quite a bit of bottle sealing wax. One pound of wax will do about 40 to 80 bottles depending on how far you dip the neck into the wax. You may also need more sealing wax than this to create a reservoir deep enough to coat the amount of the bottle neck you want. This is dependent on the profile of the tin you select.
  • Pour the sealing wax directly onto the cork itself.
    The second way to use the sealing wax is more efficient but not as decorative. Inset the cork by an eighth to a quarter of an inch into the neck of the wine bottle. Then pour a disk of wax into the inset. You will want to pinch a spout onto the tin you are using. Heat protective gloves will be needed for this method, as well. Just like dipping the bottle into the wax, the cork is sealed air-tight, but will use much less sealing wax per wine bottle. You will usually get about 150 bottles per pound done with this method.Shop Heat Shrink Capsules

As you can see, how to use bottle sealing wax beads is open to some interpretation. If you are looking for full decorative value, dip the bottle neck into the sealing wax. If you are only wanting to make a better seal then use the second method and add a layer of sealing wax on top of the cork, itself.

Happy Wine Making,
Ed Kraus
—–
Ed Kraus is a 3rd generation home brewer/winemaker and has been an owner of E. C. Kraus since 1999. He has been helping individuals make better wine and beer for over 25 years.

The Art Of Fining And Filtering Wine

Fining And Filtering WineYour article on fining agents was superb. It informed as to what other benefits (other than clarity in a wine) that fining agents can produce. My question regards the connection (or benefits) of fining and filtering wine. 1) If you filter a wine, should you also use a fining agent? 2) Conversely, if you’re fining a wine, is filtering no longer suggested? 3) Do you recommend both fining and filtering wine? 4) What would be the benefits of using both ?

Thank you
Steve
—–
Dear Steve,

How you handle the combination of fining and filtering wine is partially an art. I say this because there are really no hard-fast rules to be followed. Both processes are tools that the winemaker has at their disposal to help shape a wine with the characteristics they desire. Experience will help the winemaker to use these tools more effectively.

The difference between fining and filtering wine is subtle.

Certain wine fining agents will settle out certain particles more readily the others. For example, gelatin is not very good at settling out large volumes of yeast and other proteins, while bentonite on the other hand is. However, gelatin is good Shop Wine Filtersat settling out that last, little bit of particles, while bentonite isn’t. Some wine fining agents are better at removing bitterness, or harsh aromas than other. And, so-on and so-forth… How you decide to treat the wine with fining agents will shapes the wine to some degree, as well as clear it.

When you filter a wine, you are mostly concerned with clarity. While the finest filter pads can reduce color and body to a minor degree, adding a beautiful polish can be done with the coarsest of wine filter pads – 6 microns, for example.

A recommendation I do make is that if you do decide to filter a wine, always treat it with bentonite, first. This will help to drop out any excess proteins that is in the wine, including the yeast. As a fining agent bentonite is great at clearing out large volumes of particles. This will allow your filter pads to last longer and not clog up with every gallon or two of wine being filtered. But beyond this, whether you decide to filter, or not, or what type of other wine fining agents you decide to use, if any, is completely up to you.

Shop Mini Jet Wine FilterAgain, it is important for you to know that just like some fining agents, filtering a wine can effect its body and color as well as its clarity. Depending on the fineness of the filter pad you choose, some body and color can be taken out of the wine. The finer the filter pad the more likely body and color will be reduced.

For the heaviest of wines this is usually an improvement in the sense that reduction in color will rarely be noticeable, and the amount of aging (maturation) needed will be brought down to a more reasonable time-frame through the removal of excessive body elements. For example, two years instead of five.

For lighter white wines, a fine filter pad (.5 microns or less) may be selected to reduce color and body as much as possible, making the wine look a faint-yellow instead of a straw colored and adding to the wine’s light, crisp character that it often looked for with such wines.Shop Super Jet Wine Filter

There is also the issue of the wine’s stability. Both fining and filtering a wine will help to make it more stable. By reducing the amount of tannins and other proteins there is less chance of the wine forming deposits while aging in the wine bottle.

As a novice winemaker, I would suggest that you take a middle-of-the-road approach when it comes to filtering and fining wines. Treat the wine with bentonite a few days after the fermentation has completed and then filter the wine right before bottling with a medium (1 micron) or coarse (6 micron) filter pad. This is a good starting place if you are not sure how you would like to proceed.

Happy Wine Making,
Ed Kraus
—–
Ed Kraus is a 3rd generation home brewer/winemaker and has been an owner of E. C. Kraus since 1999. He has been helping individuals make better wine and beer for over 25 years.

Fruit Wines: The Perfect Gift for Mother’s Day

Did you know over 60% of wine consumers are women?

Fruity wine flavors

While we’re not entirely surprised, it’s a pretty staggering number. From wine tasting groups to girl’s night out, women are finding all kinds of reasons to

 indulge in this timeless drink. 

As winemakers continue to experiment with varietals, tannins and flavors, many have started to explore other fruit based mixtures. Fruit wine is wine made from fruit other than fermented grapes or grape juice.

This fun new wine makes a great Mother’s Day gift or an exciting kick off for warmer weather!

Choosing Your Fruit

Depending on the time of year, there are plenty of fruits to choose from when buying or making your wine. Fruit seasonality and their fermentation period should be considered when selecting your fruit.

Here’s a guide to help you pick the perfect fruit wine for Mom or yourself:

SPRING FRUITS

  • Strawberries: A sweeter wine – long fermentation period.
  • Cherries: Bold flavor that can be as sweet/sour as you like – long fermentation period

SUMMER FRUITS

  • Blackberries: Bold red wine that tastes great when blended with apples. 2 years to age.
  • Blueberries: Creates a light rose wine – short fermentation period.
  • Peaches: White wine with a great aroma – short fermentation period.
  • Plums: Rich color and flavor – short fermentation period.

FALL FRUITs

  • Apples: A light white wine. Great base for blending wines – 2 years to age alone.

Now that you’ve chosen your fruit, let’s start wine making!

How to Make Fruit Wines

Gifting this to Mom or that special woman in your life? Try making fruit wine from scratch.

Similar to making regular wine, there are many recipes for any skill level. We’ve got a great general recipe to get you started.

What You’ll Need:

Ingredients:

  • Fruit of your choice
  • Wine yeast
  • Sugar

Tools:

  • 2 glass containers – 1 for primary and secondary fermentation
  • Fermentation bag
  • Wine bottle

Optional Supplies:

  • Hydrometer
  • Tartaric
  • Citric/malic acids for better balance and quality

Instructions:

Step One:

  • Mix sugar, water, and your cut up fruit into a fermentation bag, cover it with a towel and let it sit for a day.

Step Two:

  • Add the yeast, and replace the towel covering it. Squish the bag once a day, and let this sit for another 5 days.

Step Three:

  • Drain all the liquid from the fruit and place into the carboy. Cap with an airlock for proper fermentation
    • You can use a siphon tube for more accuracy, but if you don’t have one it’s fine

Step Four:

  • Store this in a cool and dark place for another month before repeating the fermentation process.

Step Five:

  • Once all the bubbles are gone, you can pour the wine into your glass bottle and seal it with a cork!

Congrats! You’ve made your first bottle of fruit wine.

Whether you’re buying or making fruit wine, it’s sure to be a fun experience for all. And if you’re giving to Mom, or even creating with Mom, it’ll be a fun way to celebrate Mother’s Day.

Cheers!

Augmented Reality Wine Labels

Unless you’re a true oenophile, we can all agree that it’s a difficult decision selecting a bottle of wine for any occasion. When deciphering between brands you’ve never tried, it often comes down to which bottle with the best label.

That’s why some brands started using augmented reality technology on their wine labels. This technology combines art and technology to bring wine labels, and brands, to life. Would you choose an average-looking bottle of wine over one that uses augmented reality to tell you a story?

AUGMENTED REALITY ON WINE LABELS?!

With augmented reality, each wine label is an individual piece of art that uses smartphone technology to tell the story behind the label. It’s as easy as downloading a free app on your phone, scanning the label on a bottle of wine, and watching a creative, storytelling video that will keep you entertained while drinking your wine.

Marketers have always used a brand’s story to connect with customers and build loyalty. They know that storytelling sets a brand apart from its competition and can add value to its customers. 

Global winemaker, Treasury Wine Estates, understands the power of storytelling and the ability to use technology to tell stories in different ways. That’s why they created the Living Labels app, a free app that allows customers to watch their bottles of wine come to life. After downloading the app, the only thing users have to do is take a picture with their smartphone to watch the label transform into a video-like story.

Consumers can interact with a brand, quickly navigate to a company’s website, and even find coupons and promotional offers. Having augmented reality wine labels at our fingertips enhances the wine-drinking experience while engaging and creating loyal customers.

ENHANCING THE WINE-DRINKING EXPERIENCE

Imagine that you’re at a party, and your friends are gathered around the wine bottle watching the video. The use of interactive videos makes everyone want to jump in on the fun and watch the story together. You’re even able to learn more about the brand through the content they display in the video, like coupons or links to the brand’s website.

Here are some fun brands that are taking advantage of augmented reality storytelling. 

The Walking Dead

The Living Labels app animates an impressive display of The Walking Dead characters. There are multiple wine labels for The Walking Dead, and each label tells a different story. The app’s features even allow you to turn your passion for wine into a game. If you combine multiple bottles, you’re able to unlock the greatest clash between the living and the dead. The labels on the bottles do a great job telling the story of The Walking Dead, keeping everyone entertained.

19 Crimes

Cheers to the Infamous! By the scan of a smartphone, this 19 Crimes infamous convicts from history telling their sides of the story – a customer favorite! 19 Crimes is currently growing 21 times faster than the red wine category, according to Treasury Wine Estates chief marketing officer, Angus Lilley

The emBRAZEN Living Labels collection shows prominent women from history, like Josephine Baker, Nellie Bly, and Celia Cruz. When the labels are scanned, a fire is set aflame, and consumers are able to interact with the label by dragging their finger over the label to reveal how each woman made her mark in history.

Take Your Love of Wine to the Next Level

Hey there wine enthusiast! There is no argument that shopping for wines made by the pros is the easier route for a great wine experience, but have you considered taking your love of wine to the next level and making your own? Have you entertained the idea of what delicious recipes you could concoct on your own? With wine making, you’re in total control ; you get to decide what kind of fruit you want to include, if you want to include fresh fruit or pre-made fruit juice, and embrace the science of it all to come up with your perfect recipe.

Winemaking is a fun passion project – it is a wonderful pastime and an excellent way to make friends. If you are interested in the captivating art of wine making, we’d like to share with you a few resources that might help to demystify the experience.

Need a place to start? Why not read up on the subject? Check out some books that will help you master the art of wine making.

The Art of Winemaking: A classic beginners book that uses simple language and terminology to help newbies master “the art of wine”. With over fifty wine recipes, one can make wine from a variety of different fruits. Whether you are a traditionalist looking for new ideas or a beginner who has suddenly acquired a lot of fruit, one is certain to find answers here. This book gives you endless opportunities and guidelines to experiment with wine making awesomeness.

The Winemaker’s Answer Book: This book has every solution to every problem a person might have when they are making wine. A very easy book to follow and a great tool for beginners – this book will help the most perplexed beginner become an expert after reading the book.

Winemakers Recipe Handbook: Want to make different varieties of wine? Well this book is the right fit for you. Winemakers Recipe Handbook has over 100 easy-to-use recipes for you to make.

Now that you’ve read up on wine making, let’s check out some of these essential materials you’ll need.

Wine making kits – You will have all the supplies you need to make wine when using wine making starter kits. There are three different wine making kits on our website: The SunCal wine making kit comes with SunCal concentrates and The Art of Making Wine book; the Your Fruit! wine making kit doesn’t include fruit, but does include two winemaking books; and the California Connoisseur wine making kit includes California Connoisseur wine making juice.

Wine barrels – An efficient way to store your finished wine for aging. All of Adventures in Homebrewing’s wine barrels are Hungarian oak that includes a medium toast, its own oak stand, and a fitted hardwood oak bung. The advantages of having an oak barrel is that for red wines, the barrel aging offers controlled oxidation to house several classes of complex chemicals that can add to the texture and flavor of white and red wines.

Wine bottles and corks – There are different colors and sizes of wine bottles to choose from and a lot of cork options as well. There are wooden corks, synthetic corks, superior grade corks, extra first grade, and first grade corks; so many to choose from right?

Wine filtering systemsWine filtering systems are optional depending on what kind of wine you decide to make, the source of the juice, and if your wine will be aged. You can enhance your wines appearance, shorten its aging time, and lighten its body and color. Filtering your wine also makes you wine more stable. There are two major take home filtering systems which is “Gravity Feed” and “Pressurized” filters. Gravity Feed filtration systems are performed with gravity as the only pressure. Pressurized filtering system filters the wine by forcing it through wine filter pads under pressure.

We hope that we’ve piqued your interest in the art and enjoyment of winemaking. If you’re looking for more information, check out the rest of our blog: https://blog.homebrewing.org.

When Do I Add Campden Tablets To My Homemade Wine?

Help!
I was wondering if you can straighten me out on something. I have heard that you should add campden tablets before you add the wine yeast. I should also add campden tablets after every time I rack the wine. Then add them before I bottle the wine. That seems like a lot to me.
Thanks,
Gary
—–
Hi Gary,
Thanks for such an interesting question.
You do need to use Campden tablets or some other form of sulfite such as sodium metabisulfite, or the wine could eventually spoil or turn to vinegar. But how much you should add is another issue all together.
If you’re making wine from fresh fruit, we recommend that you add one Campden tablet per gallon before the fermentation. This is the standard dose. If you are making wine from a packaged juice, this step is not necessary.
Be sure that you wait 24 hours before adding the wine yeast, or the Campden tablets may kill the wine yeast. Also during this 24 hour waiting period, be sure the fermenter is not sealed. Leave the fermenter open to the air. If you like, you can cover it with a very thin towel or netting to keep bugs and fallout from getting to it. The sulfur dioxide from the Campden tablets need the opportunity to dissipate into the air during this time.
Shop Campden TabletsWe also recommend that you add another dose of Campden tablets as soon as the fermentation has completed. You should confirm with a wine hydrometer that the fermentation has actually completed before adding them.
The only other dose of Campden tablets we recommend is right before bottling. This last dose is what will keep the wine from spoiling or turning to vinegar.
The reason we recommend only adding Campden tablets at these three times is because it is possible to add too much. By sticking with these three times “too much” is not possible. These three times assumes that you will keep the fermenter topped-up and that long-term bulk aging is not in the plans — 1 months or more.
This reason for this is that while sulfites from these Campden tablets do dissipate into the air during rackings, a large percentage of the sulfites bond to the wine. As you add more doses, the bonded sulfites build up in the wine. This build up of bound sulfite does nothing to protect the wine, but if built into a high enough concentration, it can eventually affect the wine’s flavor.
Shop Sulfite TesterHaving said all this, it is possible to add more Campden tablets after rackings, but you shouldn’t do this blindly. You need to test the sulfites that are currently in the wine before adding more. This can be done with Titrets Test Vials and the Titrettor Hand Tool. Shoot for a range of 25 PPM (Parts Per Million) for red wines to 35 PPM for whites. If you do not want to go through the testing, don’t add more than what’s recommended above.
I hope this answers your question and concerns about the use of Campden tablets in your homemade wine. I wanted to point out that this recommendation applies regardless of what form of sulfite you are adding, the three main ones being: Campden tablets, sodium metabisulfite and potassium metabisulfite. If you follow each one’s directions for the dosage you will be adding the same amount of sulfites in each case.
Happy Wine Making,
Ed Kraus
—–
Ed Kraus is a 3rd generation home brewer/winemaker and has been an owner of E. C. Kraus since 1999. He has been helping individuals make better wine and beer for over 25 years.

Wine Ideas: Strawberry-Rhubarb Wine Recipe

Strawberries And Rhubarb ChoppedStrawberry and rhubarb is a traditional, country combination that has worked deliciously for pies for who knows how long. With that country combo in mind, here’s a wine recipe that takes both great flavors from the pie pan to the wine bottle.
This is a strawberry-rhubarb wine recipe that has been made by several of our customer with great success. Its flavors are rich and layered with a bit of tang that sets if off. It has a glassy, garnet color that is almost irresistible when set on the table in front of family and friends.
While this particular version I experienced was made dry, I’m sure it would do quite well if it were made off-dry or even sweet. Making a sweet wine can easily be done by adding sugar and potassium sorbate (wine stabilizer) before bottling.
Since there has been such success with this particular wine recipe, I thought I’d share it here as well…
Strawberry-Rhubarb Wine Recipe
(Makes 5 Gallons)
2 Cans County Fair Strawberry
5 pounds Rhubarb (cubed, meaty stalk only)
8 pounds Sugar
5 Teaspoons Yeast Nutrient
5 Teaspoons Acid Blend
1 Teaspoons Pectic Enzyme
5 Campden Tablets (24 hrs. before fermentation)Shop Fruit Wine Bases
Water (To total batch to 5 gallons)
1 Pkg. Wine Yeast (Lalvin K1V-1116, recommended)
5 Campden Tablets (Before Bottling)
Use The 7 Easy Steps To Making Wine for the directions.  These directions will lead you through the process. If you need the equipment. The “Your Fruit!” Wine Making Kit will work perfect for this wine recipe.
Have you every made a strawberry-rhubarb wine recipe? If so, why don’t you share your recipe below?…
—–
Ed Kraus is a 3rd generation home brewer/winemaker and has been an owner of E. C. Kraus since 1999. He has been helping individuals make better wine and beer for over 25 years.