
 Using a wine acid test kit is fairly straight forward. The instructions that come with the kit are easy to follow, and the process is somewhat simple. Where things can get confusing is learning how to interpret the readings. When using the acid test kit you are looking for a color change in the wine sample as you add solution to it. Determining when that color change occurs can take some practice.
With that in mind, here are 7 quick tips for using your acid test kit. These are tips on how to use an acid testing kit so that you can get the most accurate readings:
- Play Around With The Acid Test Kit Before You Actually Need It
The acid test kit will provide you with about 50 tests, so you can afford to play around with it a bit and get use to how it works. If you don’t have a wine you want to test, you can test Welch’s concord grape juice. We already know from experience that you should be getting a reading of .67% with this juice.
- Use A White Background When Looking For A Color Change
Look at the wine or wine sample with a white background behind it and in plenty of light. A sheet of paper or a white wall will work fine. Having a white background will help you to determine more clearly if the wine is experiencing a color change.
- Use A Second Sample As A Comparison
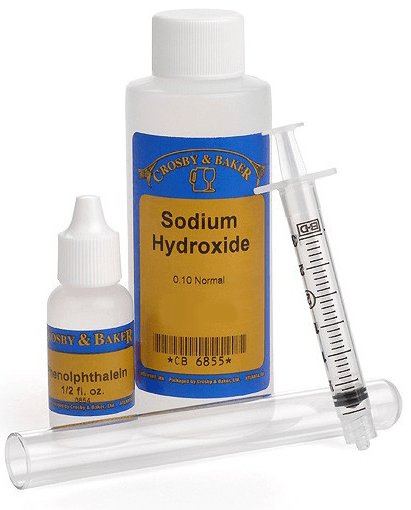
Having a second test tube filled with the same wine sample will allow you to see more accurately if the wine is changing color or not by comparing the two. Only one test tube comes with the acid test kit, but we have additional glass test tubes you can order separately.
- Make Sure The Color Change Is Through The Entire Sample
One common rooky-mistake when using the acid test kit is not waiting until the entire sample changes color. When you first add drops of the reagent you will get streaking. This is streaks of color changes that are noticeable in portions of the wine sample. This does not count as a color change. Agitate the sample until the streaking goes away. Then see if you can notice a color change in the entire wine sample.
- Heavily Colored Red Wines May Need To Be Diluted With Distilled Water
Some wines are so darkly colored that you can’t tell if a color change has occurred or not when using the acid test kit. In these situations you will want to dilute the wine sample(s) with water. But not just any water. It needs to be distilled so that the alkalinity of the water does not affect your reading.
- Calculate The Acidity By The Amount Of Reagent Used, Not The Amount Left In The Syringe
This is a good one. Many times we have run across this error. The amount of acidity in the wine is calculated by how much reagent it took to change the wine’s color. This is measured by a graduated syringe. You slowly add regent to the wine sample until the color changes. Now you need to know how much reagent you used, but many first-timers will do their calculation based on the amount left in the syringe. Be sure you do your calculation based on the amount of reagent you used. Forget about what’s left in the syringe.
- Only Use The Acid Test Kit Either Before Fermentation Or Before Bottling
This tip is pretty straight-forward. You do not want to test for acidity while there is CO2 from the fermentation still in the wine. Doing so will throw your reading off. The most convenient times for this is before the fermentation takes place, or before bottling the wine. It is important to de-gas the wine because some residual CO2 will stay saturated into the wine until it is persuaded to leave.
BONUS TIP!
Don’t Be Afraid To Test The Wine More Than Once
I have found that it is faster to do two tests than it is to do one. It can get pretty monotonous adding little drops of reagent to the wine and waiting for a color change. Yet, that’s what it takes to get an accurate acidity reading. It can take several minutes to get to the color change, and by then you might not even be paying that much attention.
So here’s what I do. I do a quick acid test, first. I put reagent in the sample fairly quickly and look for the color change. All I am trying to do with this first test is to find out ‘about‘ how much reagent it takes to get to the color change. Once I know the ‘about‘, I get a new wine sample and start all over again. I add reagent to just short of where I previously got my color change. Now I add a drop of reagent at a time, and wait for the color change.
There you have it: the 7+ tip on how to use an acid test kit for wine. They are basically some insight that I have learned the hard way of the years. Now you know them too!
—–
Ed Kraus is a 3rd generation home brewer/winemaker and has been an owner of E. C. Kraus since 1999. He has been helping individuals make better wine and beer for over 25 years.
Can you tell me the difference between "citric acid" and "acid blend" as an addition to wine?
Jojo, Acid Blend is 50% citric acid. The other 50% is made up of tartaric and malic acids. All three are by fare the most common acids found in fruits. The idea behind using a blend of acids is to help keep the wine stable. If too much of any one acid is added to a wine, the excess can fall out as crystals later on.
Can the ph be ajusted on wines after fermentation is complete. Just wondering if this would take some of the harsh bite from some wines
Myron, yes you can adjust the pH after the fermentation. Just be sure that the wine is degassed and void of any CO2 gas, as this can through off any pH readings you take.
Didn’t have my testing supplies before fermentation. Tested the acid of my fermented pear and was 4.5%. Added 6 Tbs. of acid blend to 5gl. Tested and 1%. What is wrong. Tested choke cherry and 7.5%. so think my chemicals are ok. What went wrong on the pear?
Pam, to clear something up first, your readings are actually .45% and .75%. To have the readings you suggest would literally burn the skin. What happened was too much Acid Blend was added. Each teaspoon added to one gallon will raise that gallon by .15%. You had 5 gallons at .45%. Let’s say you wanted to adjust it to .75%, that’s a raise of .30%, Or rather 2 teaspoons per gallon. You had 5 gallons so that would be 10 teaspoons, total. You added 6 tablespoons. Each tablespoon equals 3 teaspoons, so you add the equivalence of 18 teaspoons instead of the 10 that where needed.
What is the correlation between percent acid and ph?
Dr. G, pH readings can not be correlated to any corresponding titration reading and vice versa. pH strips test for all acids in the juice regardless of how sharp they are to taste. The acid test kit or titration kit tests for only for the acids that you can taste. Below is the link to an article that will discuss this in more detail.
Acid Testing
http://www.eckraus.com/blog/difference-between-ph-and-titratable-acidity-in-wine
I’m confused by step five. If I add water to the sample to make it easier to read, doesn’t that in itself reduce the acidity of the sample so then I would get a false reading different than the actual acidity of the must?
Paul, that is a good question. The acid test kit counts the number acid ions in the liquid not the concentration. Adding water does not change how many acid ions are in the liquid, it just dilutes the concentration.