
 I have the hardest time with the acid titration kit as far as finding the right color stop (acid level) any suggestions on using an acid testing kit, how to tell when to stop at the right level.
Manuel Q. – NM
—–
Hello Manuel.
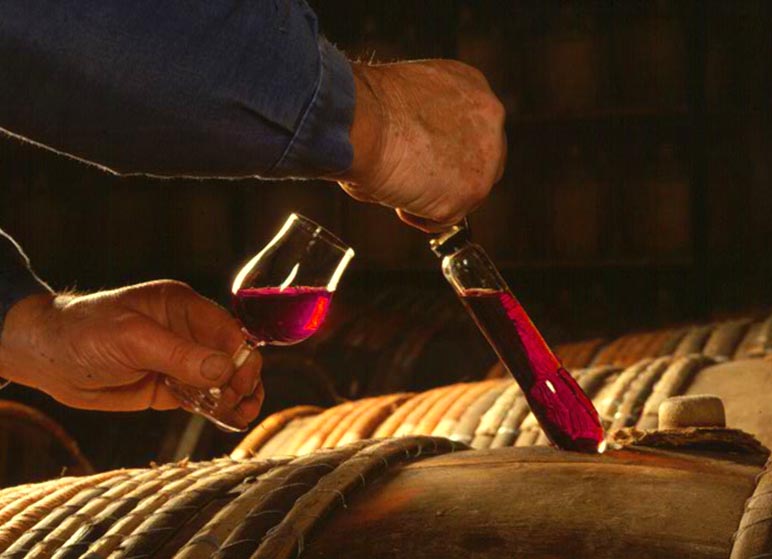
For those of you who have never used an acid test kit: basically what you are doing is taking a measured sample of wine and slowly adding sodium hydroxide to it until the wine permanently changes color. By knowing how much sodium hydroxide it took to get the color change, you can determine you wine’s acidity level.
An acid test kit can be a little awkward to use until you get the hang of it. I sometimes suggest to customers that they practice on some finished wine, first, before they actually need to use it. Here are some additional information for using an acid test kit. These are tips that go beyond the instructions you typically find with a titration kit.
- Run Through A Quick Test
When I’m using the acid test kit, the first thing I like to do is go through a test quickly. This is to establish “about” where the color change will occur. Then when doing a second test, I start off by adding enough sodium hydroxide to get close to the point of a color change. Then I add the sodium hydroxide one drop at a time. Adding the bulk of the sodium hydroxide all at once will save you a lot of time and aggravation in the long-run. With each drop you will want to shake the test-tube and see that either a magenta or grey color is dissolving completely away in the sample of wine. Streaks of either color are okay. They just need to be swirled out. It’s when the color stays permanently and alters the color of the entire sample. That’s when you want to take your measurement reading.
- Use A White Background
This tip for using an acid test kit is the one I think is the one that is most helpful. By holding the test tube up to a white background like a wall or sheet of paper you will be able to discern the color change more easily. You are essentially blocking out colors from the room, giving you a cleaner frame of reference when taking a titration of the wine.
- Use A Second Wine Sample For Comparison
Having a second test tube with another wine sample for comparison may be helpful. Put them side-by-side. Expect the color of the sample being tested to get lighter and lighter as more sodium hydroxide is added. That’s okay. You are not comparing the lightness or the darkness between the two wine samples. You are comparing the color hue of the two wine samples.
- Dilute The Wine’s Color
This tip for using an acid test kit does not apply to every wine. If the color of the wine is too opaque to see a color change, you can dilute it. Some red wines are just to dark for performing a titration. You can dilute it with distilled water. You do not want to use tap water or drinking water. Use distilled water, only. Dilute as much as you need to. This will not alter at what point the color change will occur or the math you use to calculate it.
- Make Sure The Wine Is Free Of CO2
The wine sample needs to be flat. You do not want CO2 (carbonation) from the fermentation to be in the wine sample. Carbon dioxide will throw off your reading. For this reason, the most opportune times to test your wine is before fermentation and before bottling. The wine must should be free of CO2 at both these times. If you are making your wine from fresh fruit, I would recommend testing at both times. The acidity level can change during a fermentation. The first test is to get the acidity close so that the fermentation can be healthy. Acidity plays a role in how well a yeast ferment. The test before bottling is to adjust for flavor – flat vs. tart flavors.
- Make Sure The Acid Test Kit Is Still Good
Here is the last tip for using an acid test kit. Both the activator and the reagent in your acid test kit will get old with time. This can throw off a titration reading – sometimes significantly. For this reason, it is not a bad idea to store these ingredients in the refrigerator for longer shelf-life. If you are not sure how old your acid test kit is, you can run a test on Welch’s grape juice – not from concentrate, straight Welch’s grape juice off the store shelf. It should have a reading of .67%-tartaric. If you get a reading that is higher than this, it means that your reagent (sodium hydroxide) is old and does not have its full strength.
Using an acid test kit is a great way for controlling your wine’s acidity. Hopefully these tips for using the acid test kit will help to make the process a little easier and an little more accurate.
Happy Winemaking,
Ed Kraus
—–
Ed Kraus is a 3rd generation home brewer/winemaker and has been an owner of E. C. Kraus since 1999. He has been helping individuals make better wine and beer for over 25 years.
I do the acid testing the same way but seem to end up with about 1/4" of sample at the bottom of the test tube that never changes no matter how hard I swirl it. I guess I should just ignore the bottom 1/4"?
Darren, thanks for bringing this up. Whenever you get to a point where swirling is not doing the trick, you can shake the test tube. Do not put your bare thumb over the end. Use a latex glove, or plug the whole with something that will not interfere with the acid reading.
Additional acid titration hints from a professional chemist/home winemaker:
7. Don’t use a buret. They are expensive, fragile, difficult to fill, and tie up your hands. Instead adjust the sample size so that the end point comes about one mL. This allows you to use a cheap and disposable 1 mL syringe for the std. NaOH with good accuracy.
8. With the money saved on not buying a 10 mL buret buy an inexpensive magnetic stirrer. This frees up your hands and avoids concentration gradients. You will wind up using the magnetic stirrer for many other wine related processes.
9. Every serious winemaker needs a pH meter! The inexpensive ones work just fine with a little care. Now no color change end point to worry about.
What’s the difference (to the winemaker) between using this kit and a pH meter ?
I’m not a chemist, but I’m passable with the acid test kit as far as wine goes. What I would like is verification of how to test home made vinegar to an acidity of ~5% similar to commercial vinegar.
Thank you.
Lee, you can use an acid test kit to test the vinegar. However, for example with our reagent solution, you will need to use a whole lot more of the solution to get a color change in the liquid.
What is an ideal ph for grape wine. Is that a similar result for fruit wines?
Also, your Thompson Grape wine recipe calls for 80# of grapes! For a 5 gallon batch? Is that correct?
Dave, the article link posted below will advise you what the pH range of different types of wines should be. Yes, the recipe for Thompson Grape is correct.
Getting A Handle On Wine Acidity
https://eckraus.com/wine-making-acidity/
Once you have a reliable reading from your titration kit & the acid level is too high,what do you do next to bring the acid level down in the must so that you’ll get a robust fermentation?
Susan, there are a few different ways to reduce the acid in wine as explained is the article link listed below.
Getting A handle on wine Acidity
https://eckraus.com/wine-making-acidity/
I was able to test my red wine and get an end point of grey/green, but my white is not working at all. I can’t even get the wine/phenol-phthalein indicator solution mix to turn pink even for a second when i add the sodium hydroxide. Is my wine bad? I don’t think my products are bad since they are fairly new and I was able to successfully test my red wine.